
A mod intended to enhance The Rise of the Witch King and add a new campaign |
| Welcome Guest ( Log In / Register ) |
|
 |
Quick Lists Top RatedTutorials Living World Map G Ultimate beginner' Arrow scaling bug Raising Heroes max Simple Structure B Creating an asset. Making a simple Ma Quick and easy sno Proper Fire Arrow BFME1 AI Tutorial Mods The Dwarf Holds The Peloponnesian RJ - RotWK The Elven Alliance Helm's Deep Last H The Elven Alliance Special Extended E Kings of the West RC Mod The Wars of Arda Downloads BFME1 1.06 Widescr Enhanced W3D Impor Fudge's Map Pack LotR/BfME HD Logos Osgiliath Shellmap Crystals Of Ancien 2v1 Wold Converted BFME2 an The forests of Dru ROTWK animations f |
|||||||||||||||||||
 |
Register and log in to move these advertisements down Texturing a Gondorian Shield
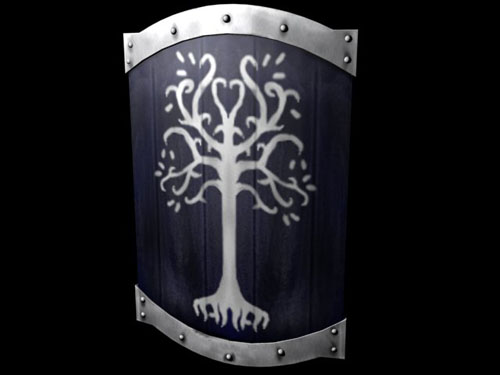 This tutorial will explain the basic process I use to create an object composed of sheet metal. The following covers the creation of a shield, but the techniques can be applied to nearly any type of sheet metal. I assume you know the basics of Photoshop - the tutorial is written for CS1, but applies in many of the previous (and later, I believe) versions. First, you should probably have decided on the type of shield, and your design. It is important to think about it because you can then examine what symmetry the shield has. You will only need to draw half of a Gondorian shield, for example, and perhaps only a quarter of a Rohirrim shield. Overall, this increases the amount of detail you can put into a shield (larger texture area for a smaller object). Even more important if you are using up valuable space on the model's actual texture with the shield. As you can see, we're going to be working on a Third Age Gondorian shield. I'm not concerned about accuracy here, so bear with me if the shield is a bit different than the movie version. It is composed of (at least in my view), a panelled wood surface with the White Tree painted on it. This is enclosed by a pair of metal braces. To begin, create a new document in Photoshop (herin referred to as PS), of size 256x256 pixels. This is a bit large for a shield, but still useable. Fill the background with black. Shield Layout It is important to lay out the texture in an efficient fashion. I am going to illustrate the creation of a back, edge, top and front side, so we need to distribute these areas accordingly. Create a new layer, name it "shield front". It may be useful to enable the ruler (view -> rulers) and set its measurements to pixels (edit -> preferences -> rulers). To the left of the image, select an area around 85 pixels wide and fill it with a deep navy blue. Duplicate this layer and move it to the right of the image. Name it "shield back" Create a new layer again, name this one "shield side". Fill half of the remaining area in the middle area of the shield with the same blue.  Next we create the basis for the metal. So, use a medium grey brush with hard edges, around size 13 or so, and carefully draw in the metal area at the top of the shield. THIS MAY TAKE SEVERAL TRIES. The undo button is your best friend. I know mine isn't perfect. You'll then want to duplicate the layer, then (edit-> transform) frip the clone vertically so that you don't have to draw it again. Then, duplicate again and move it over to the right side of the texture (shield back). Flip this horizontally so that it lines up. Then, again, carefully, take the eraser and shave off a few pixels so that the metal on the back is only a few pixels thick. Merge this and the other metal layer back into to the shield metal layer.  Next, draw in the metal that covers the edge piece as is shown in the following picture. Also, select a portion of the remaining black area and fill it with grey to create the top of the shield. 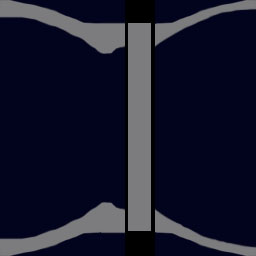 That concludes the "laying out" of the texture CommentsDisplay order: Newest first Yarrum - Sunday February 28, 2010 - 21:02 Excellent tutorial. In case you weren't aware though, the Gondorian shield is actually wood faced with leather, not painted wood. |
 |
|||||||||||||||||||

"One site to rule them all, one site to find them, © All Rights Reserved Eric Edwards ©2013. |
|||||||||||||||||||||


