
A very simple BFME1 mod with a few changes and balances |
| Welcome Guest ( Log In / Register ) |
|
 |
Quick Lists Top RatedTutorials Living World Map G Ultimate beginner' Arrow scaling bug Raising Heroes max Simple Structure B Creating an asset. Making a simple Ma Quick and easy sno Proper Fire Arrow BFME1 AI Tutorial Mods The Dwarf Holds The Peloponnesian RJ - RotWK The Elven Alliance Helm's Deep Last H The Elven Alliance Special Extended E Kings of the West RC Mod The Wars of Arda Downloads BFME1 1.06 Widescr Enhanced W3D Impor Fudge's Map Pack LotR/BfME HD Logos Osgiliath Shellmap Crystals Of Ancien 2v1 Wold Converted BFME2 an The forests of Dru ROTWK animations f |
|||||||||||||||||||
 |
Register and log in to move these advertisements down Leather Skinning TutorialTutorial for
Straps Create a new layer, name it "strap". Draw a small box using a size 2 painbrush where you wish one of the straps to be. 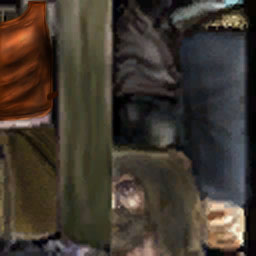 Use a tiny dodge brush to highlight the edges of this piece of leather. That's pretty much it for this bit. Create another layer, labeled "strap metal". Take a very low saturation light brown and draw half a tiny, simple buckle where the strap ends. We draw half since it on this skin it will be mirrored, so we only need half at this point. If the skin configuration was different, the whole buckle might need to be drawn. You'll also want to put a tiny stud to anchor the strap to the chestplate. Apply a few highlights with a strong dodge brush.  You'll next need to shade the "strap" layer. Using a size 2 Burn brush on Highlights, exposure 30%, darken the area around the stud and the buckle so that the illusion of depth is given. Then, select the "shirt" layer and, using the same burn brush shade around the strap.  You might want to edit the strap a bit. Do so now, then copy it three times as shown. You can now merge all the strap metal and strap layers together, and use a large burn brush on highlights to shade them in a way that matches the rest of the armour.  The straps are now complete. There is only one more bit of leatherwork that will be especially useful, and that is the belt. We will now be constructing an ornamental belt for this warrior. |
 |
|||||||||||||||||||

"One site to rule them all, one site to find them, © All Rights Reserved Eric Edwards ©2013. |
|||||||||||||||||||||


 BFME
BFME BFME 2
 ROTWK
ROTWK

 Previous