

Fixing problems with BFME 2 and giving it more depth. |
| Welcome Guest ( Log In / Register ) |
|
 |
Quick Lists Top RatedTutorials Living World Map G Ultimate beginner' Arrow scaling bug Raising Heroes max Simple Structure B Creating an asset. Making a simple Ma Quick and easy sno Proper Fire Arrow BFME1 AI Tutorial Mods The Dwarf Holds The Peloponnesian RJ - RotWK The Elven Alliance Helm's Deep Last H The Elven Alliance Special Extended E Kings of the West RC Mod The Wars of Arda Downloads BFME1 1.06 Widescr Enhanced W3D Impor Fudge's Map Pack LotR/BfME HD Logos Osgiliath Shellmap Crystals Of Ancien 2v1 Wold Converted BFME2 an The forests of Dru ROTWK animations f |
|||||||||||||||||||
 |
Register and log in to move these advertisements down Leather Skinning TutorialTutorial for
Belt To make the belt, first create a new layer, name it "belt" (big surprise). Using a size 5 brush, draw in a rough belt with hard edges. Use a dark brown colour. 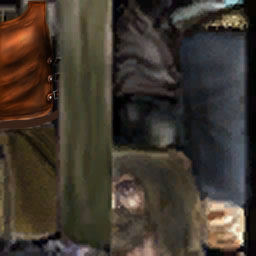 You'll then want to create a new layer - "belt engravings". Take a lighter version of the colour you used for the belt, and a size 1 brush. Carefully draw a pattern of inscriptions on it. I used this for reference. 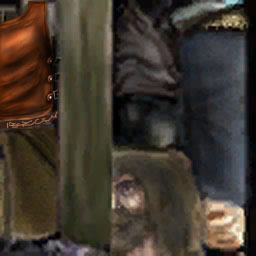 Looks quite terrible. So, begin with the lighting effects! You will want to apply a dodge of exposure 25% on highlights to both the belt and belt engravings layer. The highlight should of course be stronger on the top, but don't let that stop you from highligthing the bottom Set the belt engravings layer to opacity 85%, to reduce the contrast. You could also outline the stitching on the top and bottom of the belt, like we did with the chestplate, but at this resolution there are simply too few pixels to do that.  The buckle is the last remaining section to create. As you can see from the reference, it is of the double loop style... we only need to draw one loop because the texture wil be mirrored. Therfore, make a new layer called "buckle". Use a medium grey with a small brush to create it, then highlight with dodge along the outer edges. Use Burn, set on highlights, to darken the inner edges. This will give the buckle the illsion of being slanted. Finally, switch back to the belt layer and use a hard burn brush to create the shadow the buckle casts. 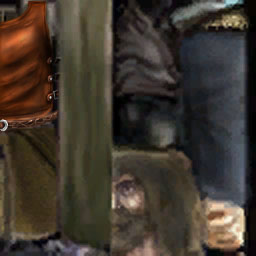 |
 |
|||||||||||||||||||

"One site to rule them all, one site to find them, © All Rights Reserved Eric Edwards ©2013. |
|||||||||||||||||||||


 BFME
BFME BFME 2
 ROTWK
ROTWK

 Previous