
The ultimate map mod |
| Welcome Guest ( Log In / Register ) |
|
 |
Quick Lists Top RatedTutorials Living World Map G Ultimate beginner' Arrow scaling bug Raising Heroes max Simple Structure B Creating an asset. Making a simple Ma Quick and easy sno Proper Fire Arrow BFME1 AI Tutorial Mods The Dwarf Holds The Peloponnesian RJ - RotWK The Elven Alliance Helm's Deep Last H The Elven Alliance Special Extended E Kings of the West RC Mod The Wars of Arda Downloads BFME1 1.06 Widescr Enhanced W3D Impor Fudge's Map Pack LotR/BfME HD Logos Osgiliath Shellmap Crystals Of Ancien 2v1 Wold Converted BFME2 an The forests of Dru ROTWK animations f |
|||||||||||||||||||
 |
Register and log in to move these advertisements down Thick-grain Cloth TutorialTutorial for
Cloak So, create a new layer, name it 'cloak'. Simple, using a hard edged olive green brush, draw over the old cloak, being careful not to overlap on any of the new-drawn parts.  Then, once again, we add primary shadows. Use a burn brush , size 3, define the hood. For this you basically draw a black line with these settings. Then, use a larger, soft burn brush to further define this area. Using the same brush, draw a few lines downward to create a few cloak folds. This stage is just basic shadows, so don't worry about being precise. 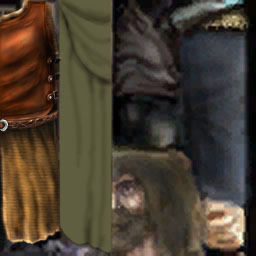 Similarly, add basic highlights. I suggest a dodge brush of size 9, on highlights. Exposure between 20 and 40%. For the larger areas, you may want to use up to size 19. Places to highlight- the bottom of the cloak, the lower edge of the hood. Otherwise, just mirror the shadows. 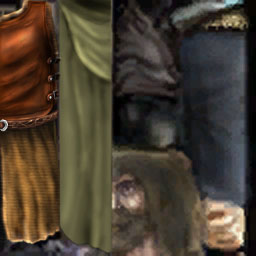 Then, we add a texture. I find a good way to add texture in the form of the rough wool used for a cloak to be adding a grain. So go to filter -> Noise -> add noise. I suggest a value of around 1.2%. This should give it a nice, but not too visible grain.  Next, detailed highlights ahve to be applied. Take a brush of size 5-13, with low hardness, and dodge (using highlights) to accentuate the folds you drew earlier. You can also add some new, finer folds, but be careful not to over-highlight anywhere except edges. Correspondingly, add shadows with a similar brush, but using burn (midtones).  That's probably the conclusion of the cloak. But wait! How is the cloak attached? Now we need to draw the cloak overtop of the chest armour, around the neck. So, create a new layer, with a name like 'neck cloak'. Using the same colour that was used as the base for the cloak, draw in the shape overtop of the leater vest (note: you may have to move the new layer to above the 'vest' group)  Simply use the same method as for the cloak to draw in a few fold lines, add noise, then accentuate them 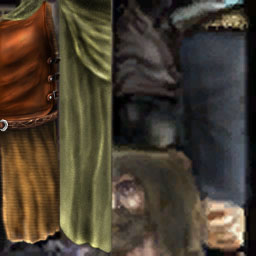 We must however also add shadows that this bit of cloth casts, so go and select the 'shirt' layer, and switch to a size 9 0% hard burn brush. Brush in a bit of shadow around the edges of the bit of cloak you drew.  |
 |
|||||||||||||||||||

"One site to rule them all, one site to find them, © All Rights Reserved Eric Edwards ©2013. |
|||||||||||||||||||||


 BFME
BFME BFME 2
 ROTWK
ROTWK

 Previous