

A Mini Mod adding the Galadhrim Warriors to the Elven Faction in ROTWK. |
| Welcome Guest ( Log In / Register ) |
|
 |
Quick Lists Top RatedTutorials Living World Map G Ultimate beginner' Arrow scaling bug Raising Heroes max Simple Structure B Creating an asset. Making a simple Ma Quick and easy sno Proper Fire Arrow BFME1 AI Tutorial Mods The Dwarf Holds The Peloponnesian RJ - RotWK The Elven Alliance Helm's Deep Last H The Elven Alliance Special Extended E Kings of the West RC Mod The Wars of Arda Downloads BFME1 1.06 Widescr Enhanced W3D Impor Fudge's Map Pack LotR/BfME HD Logos Osgiliath Shellmap Crystals Of Ancien 2v1 Wold Converted BFME2 an The forests of Dru ROTWK animations f |
|||||||||||||||||||
 |
Register and log in to move these advertisements down Texturing a Gondorian Shield
Metal The most important thing that is key to making metal look right is lighting. I can plop a grey mass down and call it metal, but real metal reflects light in a ceratin way. So therfore, we must work on hilighting the metal that is present on the shield. First thing to do is decide on the direction of the light. Here, the majority of the time, light will be coming at a downward angle from above. Soooo... that is where we'll put the highlights and corresponding shadows!. Make sure the "shield metal" layer is selected and grab a Dodge brush, set on Highlight mode, of around size 13, exposuse 25%, with a hardness of 0%. The shield is rounded, so we want to emphasize that by highlighting the centre of the front metal bands significantly. Correspondingly, highlight the edge of the back metal bands. The centre top piece should be highlighted all round lightly, but concentrated in the middle. All highlighting is subjective, you choose what looks right. I'm just going to tell you how. Use quick bruh strokes instead of long ones so that you can easily undo, do not over-highlight large areas like these. If it ever turns pure white, you've highlighted too much. 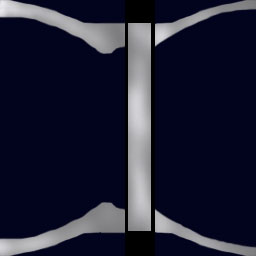 Now we move on to the edge highlights. Light shines off edges a lot, and looks cool doing it. So take a dodge bursh of size 3, with hardness 100% on highlights, and start to go along the edges that will be highlighted. Some things to keep in mind: -Where is the light coming from? This affects where the highlight will show up - you will not see a strong highlight on an edge that is facing away from the light -Highlight ALL edges a tiny bit, to give them a bit of an edge -Again, do not over-highlight. White at this stage is fine though, as long as you keep it very fine 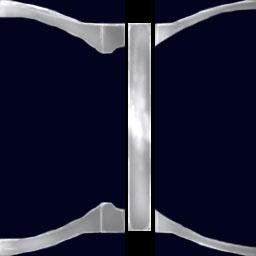 Now, the edges are done.. but it looks a bit strange, with just the edges highlighted. So, take a brush with less hardness and spread the higlights out. Again, this is an intuitive process... it takes a good eye and practice. I use a 0% hardness 5-9 pixel brush to simply "round off" some of my highlights, and emphasize others. At this stage, you can experiment with the exposure value. Metal is never perfectly uniform in reflectivity, so a bit of variation is welcome. 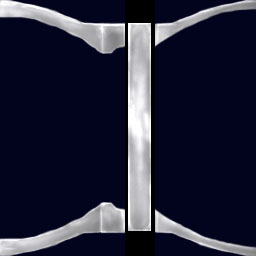 Once you are satisfied with your highlight job (don't worry though, you can always come back to it), go to Filter-> Noise -> Add noise. This de-uniformizes the metal a bit. Set it to Gaussian, and Monochromatic. Mess around with the Amount a bit, I recommend between 1 and 1.5% for this particular texture. Then, notice that the original shield has a few metal rivets. We'll create those next. Create a new layer, name it "rivets". Using a 100% Hardness 5 pixel paintbrush, create a single medium grey dot somewhere on the layer. We need to highlight this. Use a high exposure dodge brush to highlight the centre to round it, the use a low exposure brush for highlights around the top. You can even use a Burn brush set on midtones or highlights to darken the bottom of the new rivet if you like. Then, once you're satisfied, duplicate the rivet and move it to the right locations as shown by references. Merge them all into one layer and modify the layer opacity until it "looks right". 85% is around right in this case. The next step is a little touchy. You want it to look like the rivets are casting a tiny shadow.... so go back to the metal layer and select the Burn tool, on Highlights mode, with armound 25% exposure. Carefully burn a tiny shadow around each rivet. If pulled off correctly, it adds to the realism and visibility in-game. I'll take this moment to say something. Shadows and highlights should be exaggerated. Otherwise, the game's LOD will blur the details and they will become invisible. So don't worry if things jump out of the texture. 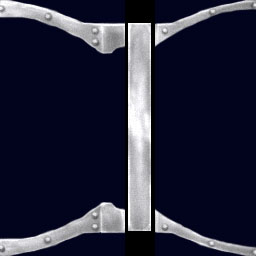 The metal should be approximately done now. CommentsDisplay order: Newest first Yarrum - Sunday February 28, 2010 - 21:02 Excellent tutorial. In case you weren't aware though, the Gondorian shield is actually wood faced with leather, not painted wood. |
 |
|||||||||||||||||||

"One site to rule them all, one site to find them, © All Rights Reserved Eric Edwards ©2013. |
|||||||||||||||||||||


 Previous