
A huge expansion for RotWK, adding multiple eras, numerous new factions and a full campaign. |
| Welcome Guest ( Log In / Register ) |
|
 |
Quick Lists Top RatedTutorials Living World Map G Ultimate beginner' Arrow scaling bug Raising Heroes max Simple Structure B Creating an asset. Making a simple Ma Quick and easy sno Proper Fire Arrow BFME1 AI Tutorial Mods The Dwarf Holds The Peloponnesian RJ - RotWK The Elven Alliance Helm's Deep Last H The Elven Alliance Special Extended E Kings of the West RC Mod The Wars of Arda Downloads BFME1 1.06 Widescr Enhanced W3D Impor Fudge's Map Pack LotR/BfME HD Logos Osgiliath Shellmap Crystals Of Ancien 2v1 Wold Converted BFME2 an The forests of Dru ROTWK animations f |
|||||||||||||||||||
 |
Register and log in to move these advertisements down Texturing a Gondorian Shield
The Tree The one remaining major component of the shield is of course the White Tree of Gondor. Now, at first glance, this is quite difficult to draw accurately. The first glance is correct. First, you'll need to grab a good reference. The best I found (took me all of 30 seconds) is HERE. Create a new layer, names "tree". Use a very light grey brush with 100% hardness for this. Size will vary. Remember, you only need to draw half the tree. I'll provide a few pictures of the stages my tree went through. The undo key is your friend. 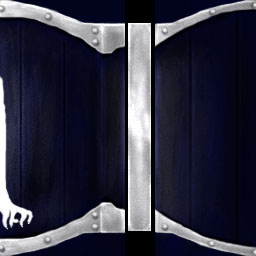 Used a size 9 brush for the trunk, size 3 and 1 brushes for the roots. 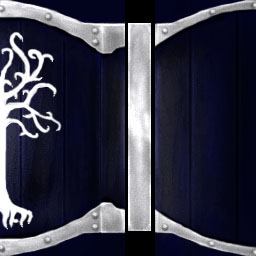 Used sizes 5, 3, and 1 for the branches. 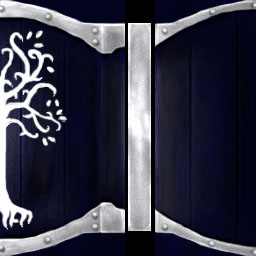 Used sizes 3 and 1 for the leaves. You could also just copy the picture... or trace it... but it's more rewarding to say "Yes, I drew that." to someone who asks. Now, apply a bit of noise to the tree layer. A few highlights will also help the tree blend in. Use a dodge brush to apply the same pattern of higlights as you did to the front of the the shield. You can also use the burn tool set on highlights to darken the tree where it crosses the wood panel lines.  This here is the finished version. I've done a bit of further work, mainly just touching up the highlights with Dodge, Burn and Desaturate. Again, this is subjective. Once you have something that looks right, stop. Now you can UV map it to your shield model and use it. There's even a bit of space left on the texture for straps and buckles, if you're modelling those as well. 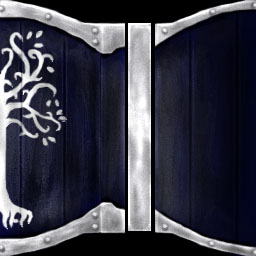 CommentsDisplay order: Newest first Yarrum - Sunday February 28, 2010 - 21:02 Excellent tutorial. In case you weren't aware though, the Gondorian shield is actually wood faced with leather, not painted wood. |
 |
|||||||||||||||||||

"One site to rule them all, one site to find them, © All Rights Reserved Eric Edwards ©2013. |
|||||||||||||||||||||


 Previous