
A mod that intends to bring back the fun to BFME1 |
| Welcome Guest ( Log In / Register ) |
 |
Quick Lists Top RatedTutorials Living World Map G… Ultimate beginner'… Arrow scaling bug… Raising Heroes max… Simple Structure B… Creating an asset.… Making a simple Ma… Quick and easy sno… Proper Fire Arrow… BFME1 AI Tutorial Mods The Dwarf Holds The Peloponnesian… RJ - RotWK The Elven Alliance… Helm's Deep Last H… The Elven Alliance Special Extended E… Kings of the West… RC Mod The Wars of Arda Downloads BFME1 1.06 Widescr… Enhanced W3D Impor… Fudge's Map Pack LotR/BfME HD Logos Osgiliath Shellmap Crystals Of Ancien… 2v1 Wold Converted BFME2 an… The forests of Dru… ROTWK animations f… |
||||||||||||||||||||
 |
Register and log in to move these advertisements down Texturing a Gondorian Shield
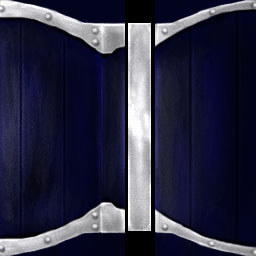
Wood The shield is made of wood, which is painted a dark navy blue, almost black. We need to develop a shading method that will illustrate this. SO, go to the "shield front" layer. Select Burn, and use a midtones brush to slightly shade the areas around the metal - where the metal would cast a tiny shadow. Then, switch your bush to size 3, still on midtones and lightly create lines down the front of the shield. They willl form the shading for the individual wood boards. These can be made more easily by holding Shift (constrains to horizontal/vertical). Repeat both of the above steps for the back of the shield. Then, switch to Dodge, using the highlights mode, with a size 3 brush. Lightly highlight on both sides of the panel lines - again, this gives more definition to the lighting... but you don't want too much, as these are barely visible on the shield prop.  Next, we need to paint in the shield highlights, just like the metal highlights. Wood doesn't reflect as much as metal, so these will be less intense. Take a large dodge brush on highlights to lighten the centre of the front and edges of the back layer.  Notice that the metal is now much too blue. The highlights brought out the saturation a bit too much. So, use the desaturate tool to steal away a bit of that colour. Some bits may need to be rehighlighted, so continue at it until you have something you like. This again is very subjective, but try to give a bit of a streaked look - wood is like that. Now, you are going to want to apply edge highlights to the parts of the shield that will be "on edge", so to speak. Use a small (3) dodge brush on highlights, and desaturate as necessary.  That concludes the wood panels. CommentsDisplay order: Newest first Yarrum - Sunday February 28, 2010 - 21:02 Excellent tutorial. In case you weren't aware though, the Gondorian shield is actually wood faced with leather, not painted wood. |
 |
|||||||||||||||||||

"One site to rule them all, one site to find them, © All Rights Reserved Eric Edwards ©2013. |
|||||||||||||||||||||