
A RotWK mod that adds Arnor, splits Gondor and Rohan, improves the Inn/CaH system, and adds heroes |
| Welcome Guest ( Log In / Register ) |
|
 |
Quick Lists Top RatedTutorials Living World Map G� Ultimate beginner'� Arrow scaling bug� Raising Heroes max� Proper Fire Arrow� Creating an asset.� Simple Structure B� Making a simple Ma� Quick and easy sno� Making patrols nea� Mods The Dwarf Holds The Peloponnesian� RJ - RotWK The Elven Alliance� Helm's Deep Last H� The Elven Alliance Special Extended E� Kings of the West� RC Mod The Wars of Arda Downloads BFME1 1.06 Widescr� Enhanced W3D Impor� Fudge's Map Pack LotR/BfME HD Logos Osgiliath Shellmap Crystals Of Ancien� 2v1 Wold The forests of Dru� Converted BFME2 an� ROTWK animations f� |
|||||||||||||||||||||||||||||||||||||||
 |
Register and log in to move these advertisements down Living World Map Graphics Deconstruction
Armies Armies are the primary interactive object in the LWM. They do pretty much everything that regions do not. Army Descriptors Army descriptors control the graphical properties of an army. They are found in livingworld.ini and look basically like this for most standard armies:
The entire object has a few basic properties. It has a name, 2 sounds and 6 'conditions'. The name is important as it is the handle to which the army is referred in the campaign files. The two sounds control what you hear when you click an army and when you move one - pretty self-explanatory. Objects Soldiers, Soldiers_Medium and Soldiers are the small clusters of soldiers that are shown below an army flag on the map. The object shown is determined by the Army size, which doesn't seem to be defined anywhere. It's likely that it is contrlled by the number of objects in the army. Object Banner is the factional banner object that floats above the army. Object Highlighted is the spinning ring text that shows below an army that you currently control. Object Selected is the brief flash that occurs when you click on a selectable army on the campaign map. Each of these has a few pretty simple properties. Model refers of course to the w3d file containing the model. ZOffset controls how high above the map grid the army is. This is very important as otherwise your armies will be below the terrain. Higher numbers offset the army upward. The map grid will be defined in the Regions section. Scale is how much of a scaling multiplier should be applied to the object. Hidden tells the engine to hide the object until unhidden by code (say when you click on it). This is used for the hilighted states, for example. CanFade allows the engine to apply an alpha fade to it when hiding or unhiding. Now that you know these parameters, you can put together any type of army you like easily enough. WDump can be used to look at the settings used in the various w3ds to replicate EA's stuff or you can make your own. One example of a sneaky use of armies is the way EA does cities in the stock LWM. They fake them with an army - the model is part of livingmap.w3d, but in livingworld.ini you will find:
This shows that you don't necessarily need all Objects to make an army. The City uses an invisible W3D (with a hidden object for selection) so that you can mouse over a city like Rivendell or Hobbiton to see a Palantir movie and a name. Another interesting type is the Hero:
This is for heroes you see moving around the campaign map - it's essentially a glow. The thing that's worth noting is that there is a new parameter here. Pickbox is something to override the standard model - it allows you to specify another w3d to be used for selecting the object. If you have a very small object being used for the army, it's a good idea to supply a larger pickbox so that people can click on it more easily. It's worth noting that if you are creating a new army object you should stick to the object names as the code looks for them. Therefore, only use Soldiers, Soldiers_Medium, Soldiers_Small, Boat, Banner, Hilighted and Selected as parameters. Boat and the Soldiers label also don't work well together. Here's an example of a custom army. The circle below uses Hilight and the portrait uses Banner. An invisible Pickbox is also used. 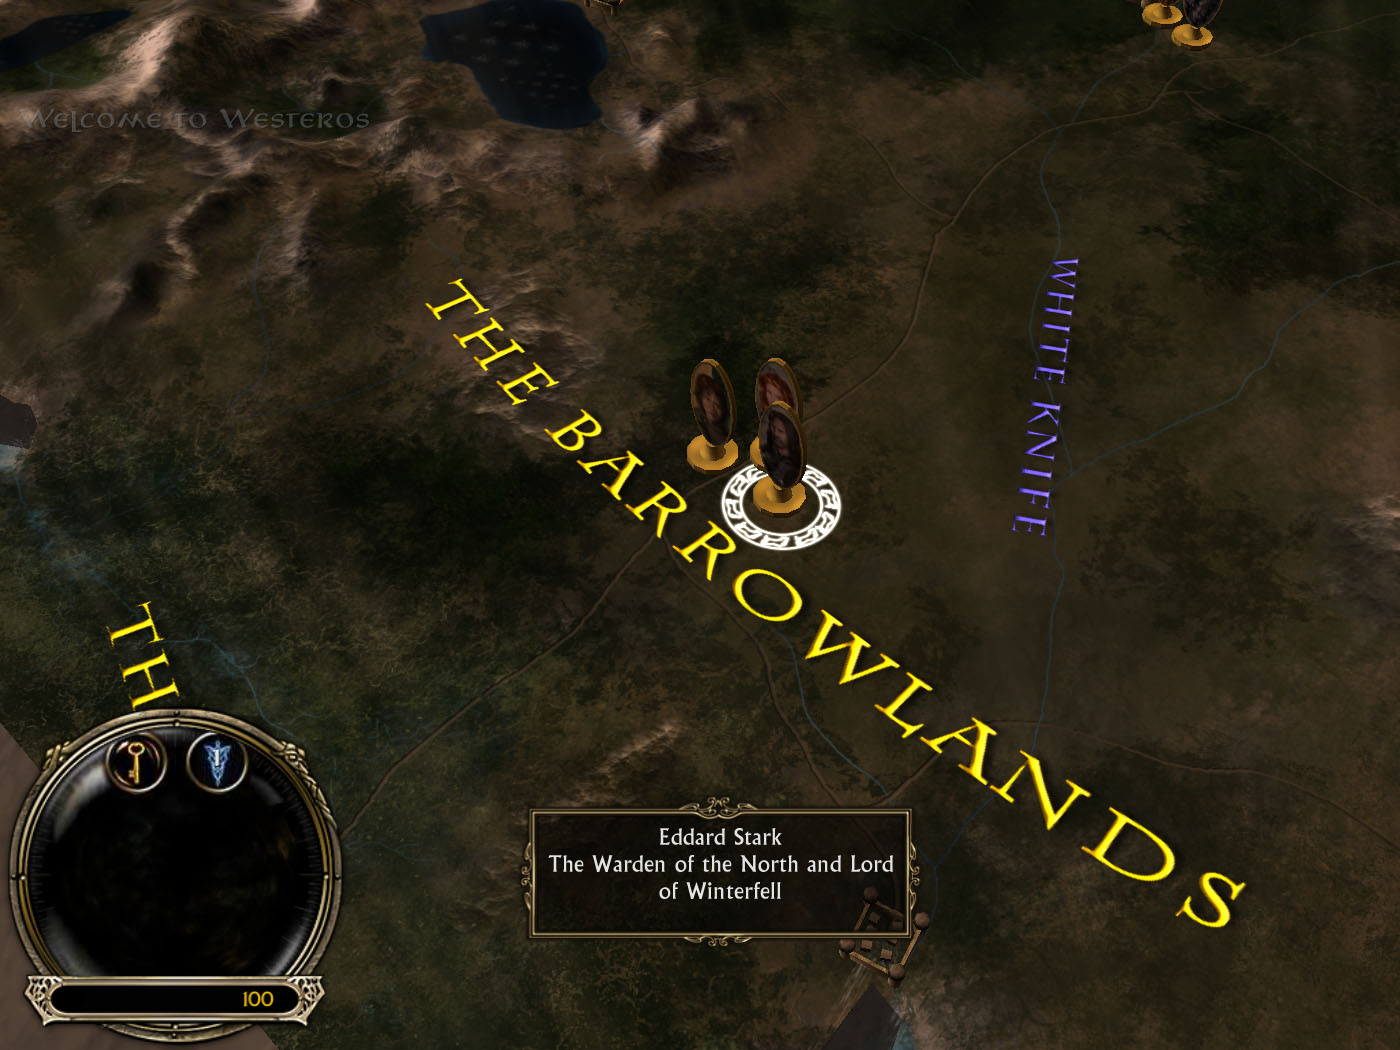 Player Armies PlayerArmies are the entries in a campaign file (gondorcampaign.ini or mordorcampaign.ini) that define the game parameters of an army. They are at the end of the file:
This is an example of a Mordor army. The Name field is a code name used to refer to it later. The DisplayNameTag refers to a string in lotr.csf/str to label the army on the map. The ArmyEntry controls those little things that say "200 Easterlings" etc. Each entry refers to a game object, notice that they are horde files. You can put pretty much anything that has an object in here. Check out the Fellowship entry:
Of note are the colours at the top of the entry; they don't seem to do anything. There are also 2 related campaign parameters that I don't discuss here:
As a final note, cities have their own PlayerArmies. They are very simple:
Spawn Armies SpawnArmy is a more campaign-specific command, but I'll talk about it here as it has relevance to the graphical properties of an army. Whenever you are going to place an army on the map, it will be done with a SpawnArmy entry in the campaign file (gondorcampaign or mordorcampaign.ini). You spawn based on the "Act" which is how the game handles the world's timeline. Most armies are spawned in Act One. Let's check out one of the entries:
The Name field is a name which will be used to refer to this army in the campaign script. The Faction controls who it belongs to. The PlayerArmy field references the PlayerArmies talked about earlier - this lets you set an army on the map's contents. The Banner field is ambiguous and doesn't seem to work properly so can just be left out. The Icon refers to the army icon you wish to use from the beginning of this page (in livingworld.ini). That lets you set the look of the army. The IconSize may control which Soldiers subobject is used, I diddn't end up testing this. The PalantirMovie refers to the movie (defined in video.ini) that you want to play when the player mouses over this army. PlayerOwned determines whether the army can be controlled by the player. PlayerControlled lets a player select and move this army. It should almost always be No as a campaign script can easily enable or disable control. Position of course lets you se where the army starts on the map. An important note: as of now it is NOT possible to make proper palantir movies. Because the edges of them need to be alpha'ed to be transparent, we would need to be able to use the VP61 adavanced profile codec, which SiberianGriffin's conversion tool does not support. You can still put VP60 videos in as palantir movies, but they will have a bit of a problem like in the following screenshot:  If you can live with that, you can follow ched's tutorial on working with VP6 files to get a video ingame. They are 192x192 pixel files like any palantir image. As usual, cities have their own army entry. They use Position to get placed directly on top of the livingmap.w3d object in an entry that's pretty simple:
Army Miscellaneous There's one other set of things you should know about armies. It's a bit of code near the top of livingworld.ini
This tells the game a few things about selecting an army, what objects to use and the like. The values are self-explanatory, they control when a fade-in starts, when a fade-in ends, how long a fade-in lasts and the corresponding fade-out properties. If you're just looking to replicate standard LWM functionality, don't touch these. CommentsDisplay order: Newest first Sulherokhh (Team Chamber Member) - Tuesday April 28, 2009 - 9:26 Whosoever dared to rate this at '4' now has to explain what is missing for it to be rated '5'. Námo - Tuesday April 28, 2009 - 1:59 Excellent! and MOST welcome - lots of thanks to both of you! |
 |
|||||||||||||||||||||||||||||||||||||||

"One site to rule them all, one site to find them, © All Rights Reserved Eric Edwards ©2013. |
|||||||||||||||||||||||||||||||||||||||||


 Previous